For those of you who have been editing your photos for some time now should be aware of these terms. However, they are often unknown or confusing to people who are new. So what is destructive and non destructive editing? Let’s see if I can explain it in this mini tutorial.
Simple explanation
Destructive – as you work on your photos you do things in a way that makes it impossible to go back and change anything. If you make a mistake, then you have to start again.
Non Destructive – everything you do on your images can be undone. Nothing is permanent, so if you do make a mistake you can go back and change it.
Working Destructively
It is very easy in Photoshop to work in a destructive way. If you avoid using layers, or continue to flatten your images you start to make it so you can’t undo a previous mistake or process. There are those that think this is fine, and I see people others this way, but it should be avoided.
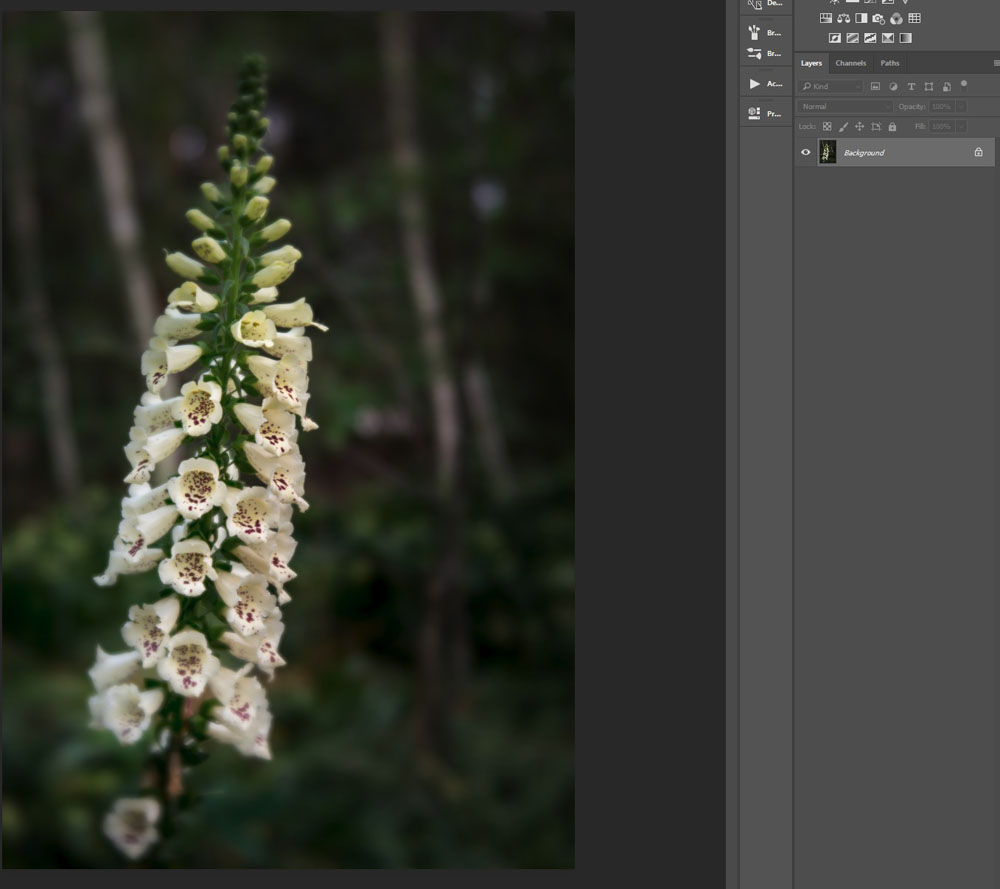
All the processing is done in the one layer. While you can go back into your history to undo things, there is only so far you can go back. If you save the image with the idea of working on it again later, you will have lost all the history. While you continue the work and if you find you missed something in the earlier session it may be impossible to change it. The only option could be starting over again.
Working Non Destructively
There is a way to work so that you can protect or change anything you have done, which is to do your images in a non destructive way. In Photoshop this means working in layers and every adjustment you do is done in a different layer.
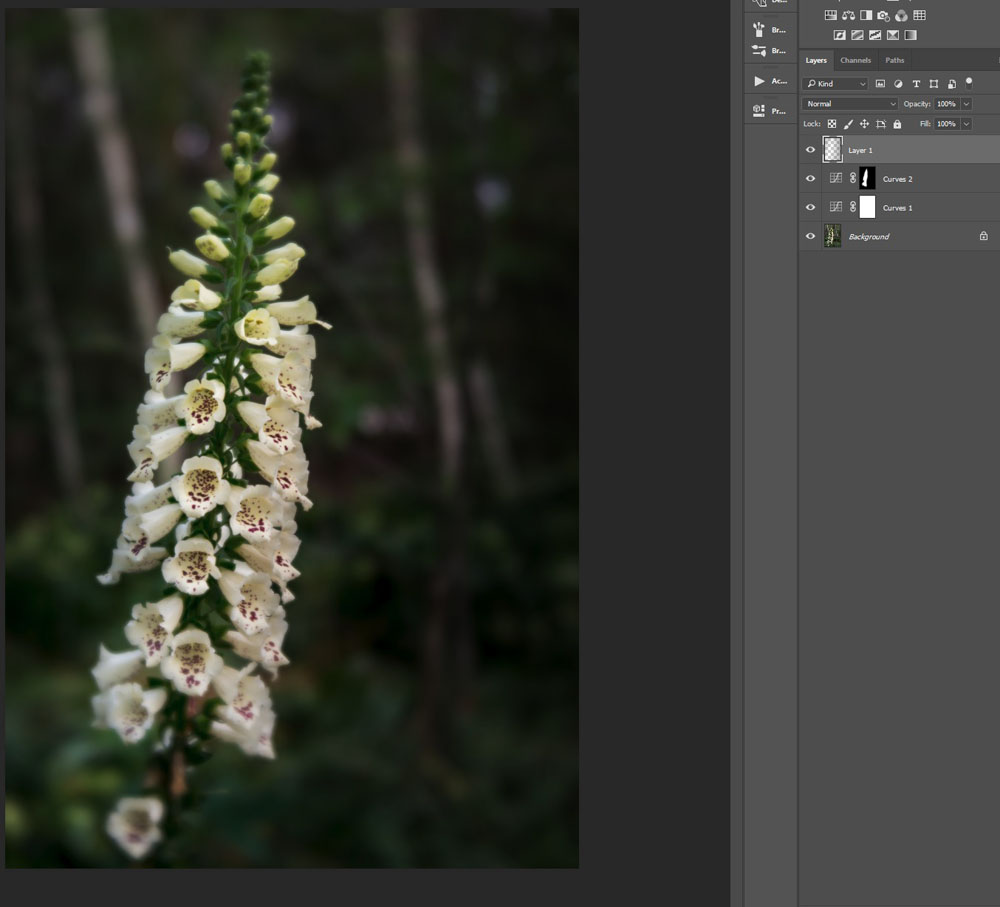
While not much editing has been done to the image you can see what was done by looking at the layers. You can turn them on and off to see if they work. If you realise you have forgotten to do something you can go back to it the later and fix the problem.
Lightroom
This program by Adobe is by nature a non destructive editing platform. Everything that is done in it can be undone. It is a great program in this respect.
There you have it, a quick description for what these terms mean. If you have other terms you would like explained, let me know and I will do my best to give you an explanation.

I’m a Lightroom fan .. I still find PS daunting .. Those layers! 😃
I don’t think you are alone there Julie, I know lots of others who feel exactly the same way. 😀
I do both. Sometimes, If I really don’t like the way it’s going, I dump everything and go back to the original image. I start over. I never overwrite the original, unedited image.
The problem with layers is file size. If you layer enough, the file gets huge. Even reducing the size of the picture and lowering the resolution so you can post it online … it’s still too big. So I use fewer layers these day. I do a lot of previewing before I accept a change. And in PS, you can always keep backing up until something you don’t like is gone. The ONLY time I flatten an image is if I’m putting text over it and using it as a backdrop. Otherwise, until I save it as a jpg, it’s got all its layers. I hang onto the original as a separate file. I may want to try redoing it — even years later.
Good post!!
I do that sometimes too, Marilyn, good to be able to do that.
I haven’t found it too much of a problem, the layers and size, when I resize for the internet I try and make it very small. I like to hang onto the originals for the same reason, I also like to hang onto the PSD files, they are my proof that the image is mine. Thanks for letting us know your process Marilyn.
Thank you so much for your mini tutorials. They are so easy to understand and follow.
You’re welcome Kaya, and thank you too, good to know.
Years back, when I started out in digital photography, I used Paint Shop Pro for editing my photos. Although it was possible to use layers, I didn’t really understand how they worked. So I worked destructively on my photos, with the thinking that “Well, I won’t edit these photos again, so I might as well do it once, and then save only the final product.” Moreover, I saved the photos in much reduced size… and, what I only learned much later, each and every time I saved a photo, the JPG would become more compressed. Sigh…
Now, years later, having moved to Lightroom, I am kicking myself that I basically messed up several years of photos. Working non-destructively is so much better and much more flexible. The downside is that I have to be really diligent about saving and backing up my catalogues… I don’t want to lose all the ‘edits’ I have made! Do you export all your photos, once you have finished editing them, Leanne? Do you keep the original (RAW or JPG) files? Or do you only keep the final edited versions? And if you do export them, what settings do you use, in terms of size, resolution, etc.?
Oh no Reggie, oh yes the compression process is even more destructive. I am so glad you have Lightroom now and can process and protect your photos. Oh yes, you do have to be diligent, but it all becomes part of the process really. No I only export the photos I’ve processed. I do two exports, one for the blog, so low res with watermark and a second one in high res so I can keep the higher res image with all the changes I made. The other photos don’t need to be exported. I used export low res so the longest side is 1000 pixels, resolution, 72, quality about 8. These are just for my blog. The high res ones, I want full size, so tell it to do that. I keep all the original RAW images. I hope that makes sense Reggie. Thanks.
Hi Leanne, thank you for explaining your process.
I also export for the blog, for social media and for sending to the people, regiments, bands, etc. I photograph at events and military parades – in 1024 x 683 pixel size, with my watermark. I still don’t completely grasp the DPI/PPI thing, so my resolution varies between 100 and 300 dpi/ppi or whatever it is. 🙂 I only recently learned that reducing the quality from 100% to 80% or something like that makes a significant difference in the file size. When I know that certain people or organisations may want to use the photos for printing for personal use or in their newsletters, etc., I give them larger versions too (between 2000 and 3000 pixels on the long side), usually without a watermark.
But I’m not really sure what settings to use for the final edited photos that I want to keep… because I have sometimes gone back to original versions and re-edited them differently, as my style has changed (‘matured’). 🙂 So I’m tempted to keep the originals… but keeping *both* the originals *and* the final edited high resolution images takes up twice the space. In my early months of using Lightroom, the catalogue became corrupted and couldn’t be rescued, and the backup catalogues were lost on a failed hard drive; I ended up starting afresh, having lost all my edits. So…. I am unsure… I guess many of us go through this kind of learning process, hey? Lots to learn still!
You welcome Reggie.
Most images I use for social media come from Photoshop so they are done differently.Yes, reducing it is fantastic, just have to be careful not to go too far. Printing is different, usually 300 dpi as well.
For final images you want to keep I would keep them as large as they are, I wouldn’t compromise on anything, you just never know. I keep both because I don’t see an issue at the moment. I have a good storage system and it seems to be okay with it. I might have to change that one day, but for now it is okay.I don’t keep images in Lightroom. I have a separate back up system and they all go there. Yes, I know what you mean, isn’t it great that there is always stuff to learn.
Thank you, Leanne. I use Adobe Lightroom and I like that it keeps a history of every single move you make to the image. You can then go back to any point, even as far back as the import, and change anything you’re not happy with. As you say, it’s good in this respect. But I do find there are things it doesn’t do, such as HDR and layers. Have you any recommendations [apart from Photoshop which would be far too complicated for me!!] that would give me a fuller editing experience? Thank you.
That is one of the many great things about Lightroom, that’s for sure. Oh, Lightroom does do HDR’s Isabella, unless you are using an older version, but I’ve used the function many times. No it doesn’t do layers, I think they have left that for Photoshop. I wouldn’t be put off Photoshop, there are a lot of functions that it does, but you don’t have to use them all. I started small and then expanded it. You’re welcome, and thank you too.
Thank you, Leanne. I am using Lightroom 4 which came with the Open University course in 2012. The only HDR I can find on there is a preset which is pretty awful. Maybe I will reconsider Photoshop then. Thanks again and very best wishes with your wonderful photography.
I think you can get the latest version of Lightroom without having to subscribe to it Isabella. If you are used to using Lightroom that might be a better way to go. Though if you are happy with it otherwise, I use Photomatix Pro for HDR. I really like it and it is pretty easy to use.
That sounds perfect for me. Thank you very much for your help.
You’re very welcome Isabella.
Hi Leanne, I recently purchased Affinity Photo by Serif that is completely non-destructive. Unfortunately, as a greenhorn in advanced photo editing, I would need some training, for which I don’t find the time right now. Thanks for the mini tutorial!
I haven’t heard of the Peter, it is good that it is non destructive, I think most of them are these days, thank goodness. I am sure you will get there, learning does take time. Thank you.
Thank you, this was very useful to me!
Thank you so much for letting me know.
Very nice! Good advice!! Dwight
That’s great Dwight, thank you.